In this post I am going to share how to download latest Red Hat Linux and install it on Oracle VirtualBox.
About Red Hat Linux:
Red Hat Linux is a popular Linux distribution initially developed by Red Hat, Inc., and is widely used in enterprise environments. Originally launched in 1994, it has since evolved into a powerful and secure operating system known for its reliability, scalability, and strong community and commercial support.
Red Hat Linux was initially a freely available distribution, but Red Hat eventually transitioned to a more enterprise-focused model. The freely available version was discontinued and split into two major branches:
Red Hat Enterprise Linux (RHEL): RHEL is a commercial version of Red Hat Linux, designed for enterprise use, with paid support, updates, and other services. It’s highly regarded in corporate environments for handling critical applications and large-scale infrastructure, including servers, cloud environments, and workstations.
Fedora: Fedora is the community-driven distribution that acts as an upstream testing ground for new features and innovations that may eventually be included in RHEL. It’s free to download and use, and it’s maintained by the Fedora Project with backing from Red Hat.
Key Features of Red Hat Enterprise Linux (RHEL)
Enterprise Support: Red Hat provides support and services, including updates, patches, and security fixes for its RHEL subscribers.
Enhanced Security: RHEL is built with a focus on security, including SELinux (Security-Enhanced Linux) for access control and other security mechanisms.
High Performance and Scalability: Suitable for running large databases, applications, and even as the foundation of cloud environments.
Container Support: RHEL offers strong support for containerization tools like Docker and Podman, and it’s widely used with Kubernetes and Red Hat’s OpenShift platform.
Create an account on Red Hat:
- Visit https://www.redhat.com/en and click on Log In at the upside corner.
- Now you will find “Register For Red hat Account” below the login box. Click on it.
- Now fill the form with proper information using your personal email id. You may get a verification link on your email after registration.
- Open your email inbox and verify your email by clicking on the link.
- Now Log In into Red hat account to download Red Hat OS.
Go to google.com and search for “download red hat linux”. You find the link to download the latest Red Hat Linux version for download.
If you are unable to find download the link, please click below link to redirect to download page.
Click on any link to download Red Hat latest version.
Link 1: Click Here
Link 2: Click Here
Direct download from my website link: Click Here
Download Oracle VirtualBox to install Red Hat on it: Click Here To Download
Steps to Install Red Hat latest version on Oracle VirtualBox:
Install Oracle VirtualBox and open it.
Click on New icon or Click on machine –> new at the top menu.
 Now do the following: (The Oracle VirtualBox software changes from time to time. The interface may different in your case but the concept is same)
Name: Type any name.
ISO Image: Click and select Other and then select the OS file.
Check the option “Skip Unattended Installation”

Hardware Section:
Select minimum 1 Gb RAM and keep the processor as it is. You can select higher RAM and CPU if your system configurations is high.

Hard Disk:
By default it will show you minimum 20 GB virtual hard disk. You can increase it or leave it as it is. After everything click on Finish button.

Note: Only follow the Red Arrow sign. keep the rest of the options as it is.
No we need to change some options in VM settings. Follow the steps.
Right click on VM you just created and click on Settings or click Settings from icon menu at the top.

Do the changes at shown here. In System uncheck the Floppy option, Select pointer device as USB Tablet.

In Network, do the following. Select Attached to as “Bridge Adapter”, Promiscuous Mode as “Allow All” and then click on OK.
(The network adapter in the “Name” section is your network adapter. In my case it is showing Wireless LAN. If you are using internet using an ethernet cable then it may show you different LAN adapter.)

Now it is time to start our Virtual Machine. Select the machine and click on Start from the top Menu. It will take some time to load the system.
OS Installation:
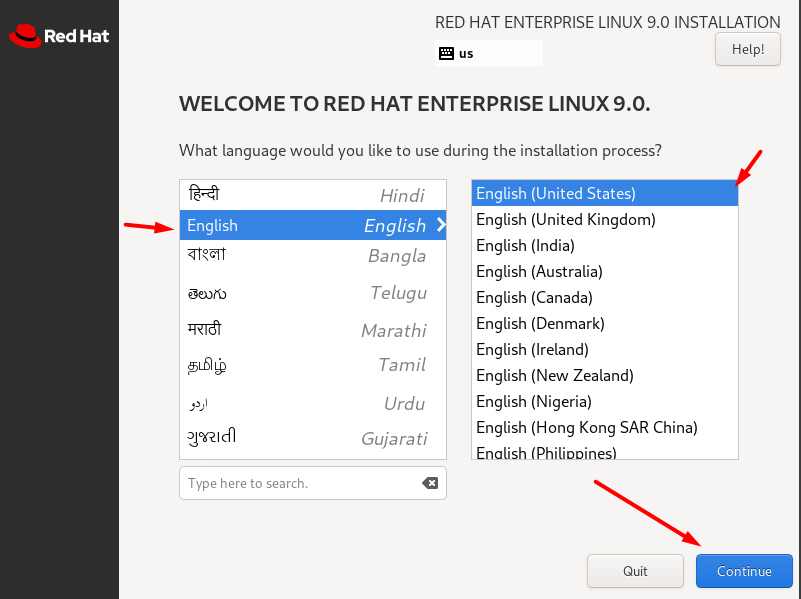
Select the language and click on continue.
We need to do the changes on the following options.
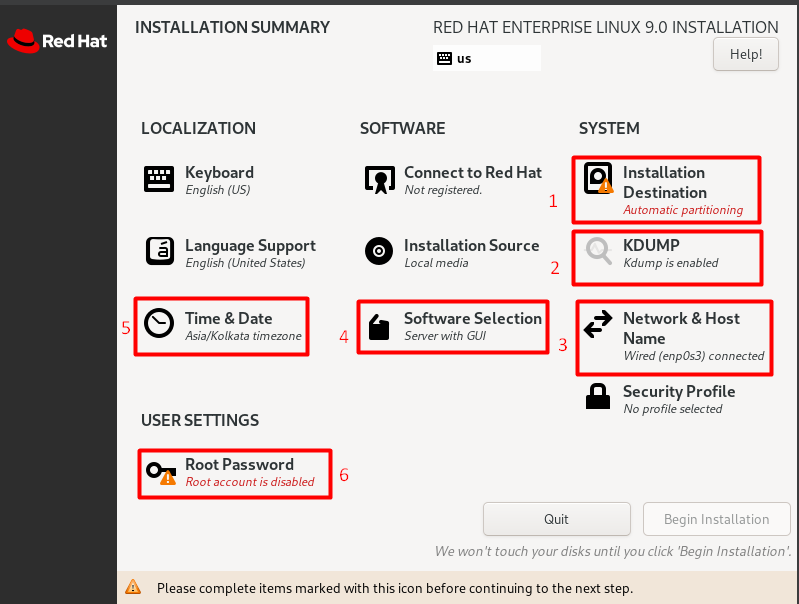
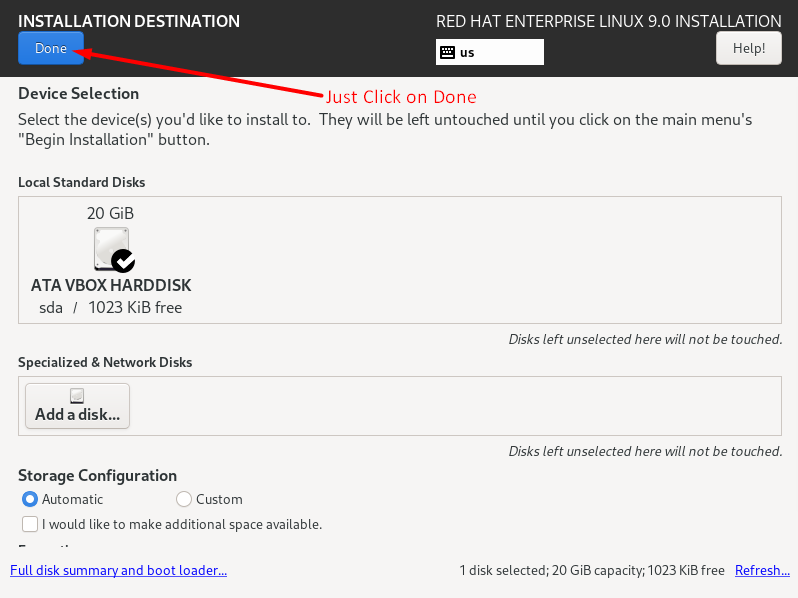
Click in “Installation Destination” and Click on Done.
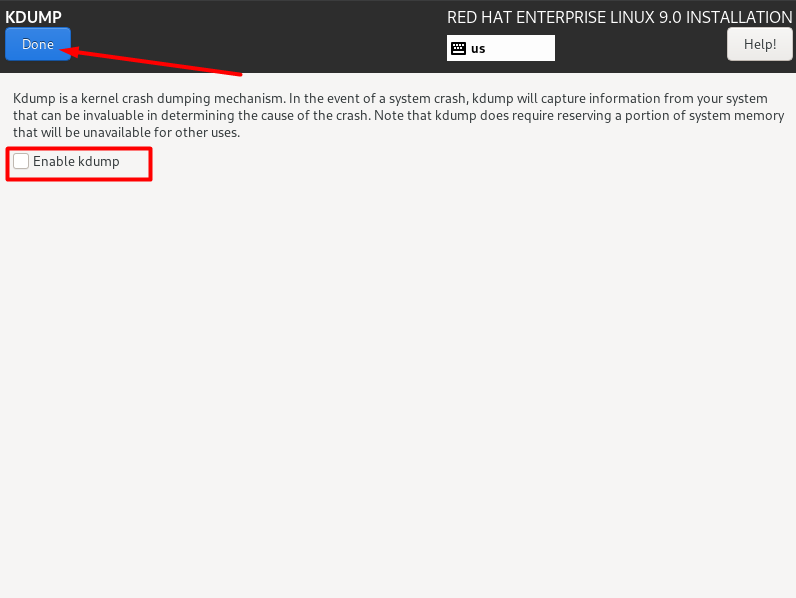
Click on KDUMP –> Uncheck the “Enable Kdump” –> Click on Done.
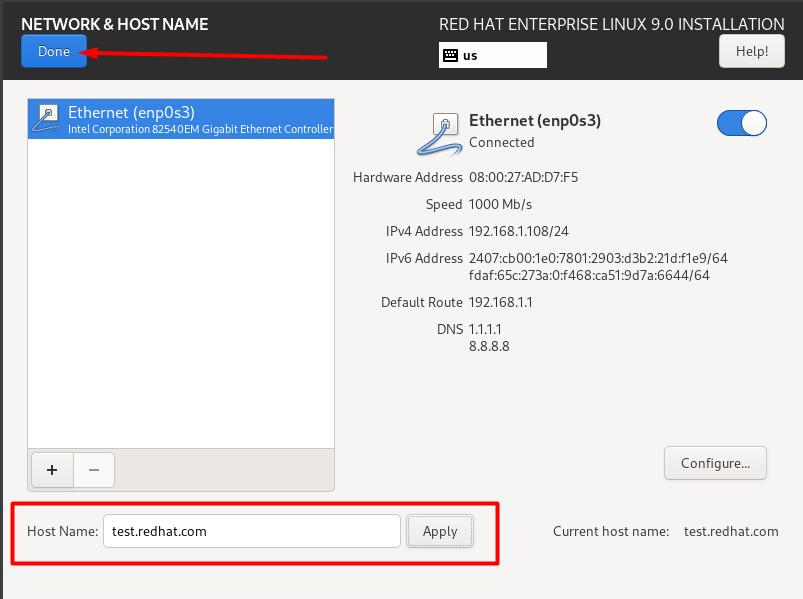
Click on “Network and Host Name” –> Type any host name and click on apply.
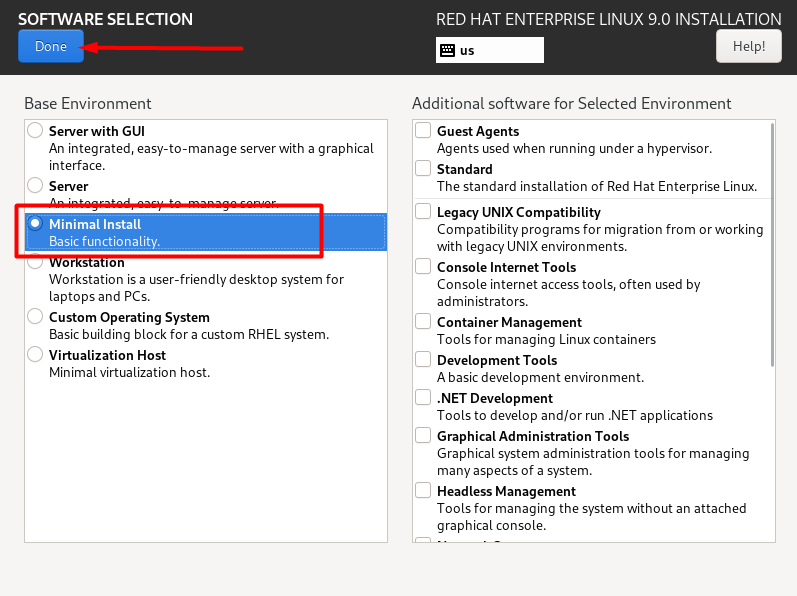
Click on software selection –> Select Minimal Install –> Done
(Minimal install will install only core packages to run the linux. If you select Server with GUI, it will install graphical interface of linux.)
Select the time and date as per your country.
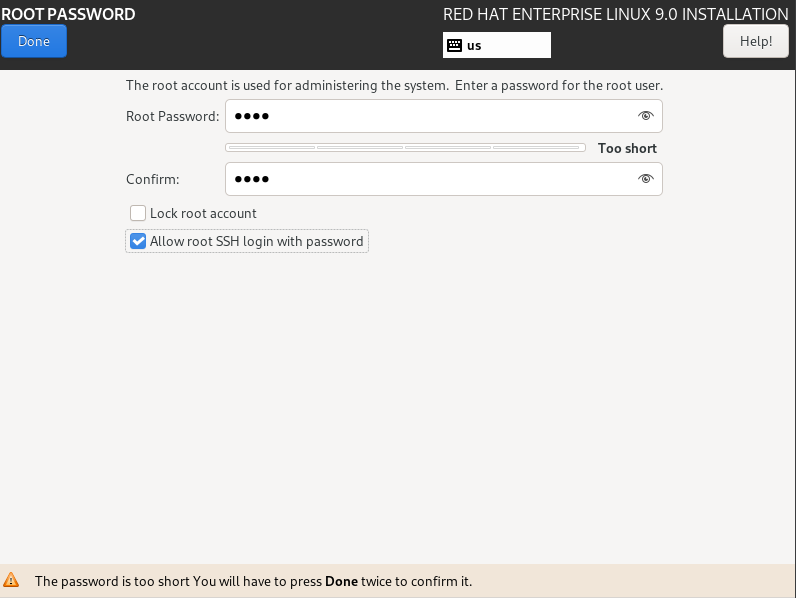
Click on Root Password and provide a password for your system. Check the SSH login Box and click on Done. (You need to click on Done button twice if you select a weak password).
Now we are ready to install our Red Hat Linux OS. Click on Begin Installation. It will take some time to install the OS.
After the installation restart the OS. Now you are ready to use your OS.
